TL;DR: The Reality Check is an agile tool designed to check if a deadline is feasible given the project context. It works by formulating a hypothesis, which can be updated every week by the technical team, where we organize our demands and the weeks before the delivery date. It only requires a simple board – physical or virtual. This tool is an alternative (or complement) for Burnup charts, Monte Carlo simulations, schedules, or other practices and techniques.
The beginning
In 2017 I was working on a project to release a new product for our customer. The team had many challenges, including an aggressive deadline. The reason for such a tight deadline was simple: the customer expected to deploy the new product in an opportune moment in Brazil because of changes in the financial scene.
When will the team deliver the next feature? When will the project be delivered? Will the deadline be respected? These are examples of questions the team had been received regularly.
We needed answers to those questions, but I didn’t have any past releases of the product or techniques based on legacy data or statistics (for example, a Burnup Chart with predicted dates). I didn’t want to build a schedule either. So, I asked for advice from some colleagues from Plataformatec.
Searching for ideas to resolve that situation, one of my work friends told me about a specific ceremony. This idea had been used in a similar condition in 2015, and I got interested. The practice consisted of putting all demands (such as user stories) on post-its and organizing them per week until the last before the deadline, forming a timeline.
They didn’t have a name for this ceremony, so they chose “Reality Check”, because it’s used to verify if it’s possible to meet the number of demands in that specific time range (considering other variables too, such as the size of the team, technical environments, dependencies with other teams or systems, etc.).
If you want to know more, you can read the blog post Bringing continuous improvements into your agile process: The Reality Check Ceremony, written by my friend Lucas Colucci.
Evolving the idea: a new tool
The idea seemed to be exciting, but in that situation, I was looking for something solid because it was necessary to keep the customer expectation aligned all the time.
So I thought: if I turn the ceremony into a tool, adding more features and practices? I built a board with our weeks, and the deadline for the first release (according to the expectation from the CEO and the Head of Products, both from our customer). I added other feature concepts to the board too, and I talked to some work friends to get more ideas. Finally, I showed it to the team, and we built the first Reality Check Tool of the project. Below you can see one real photo of the result (with blur to preserve the confidentiality of our customer):
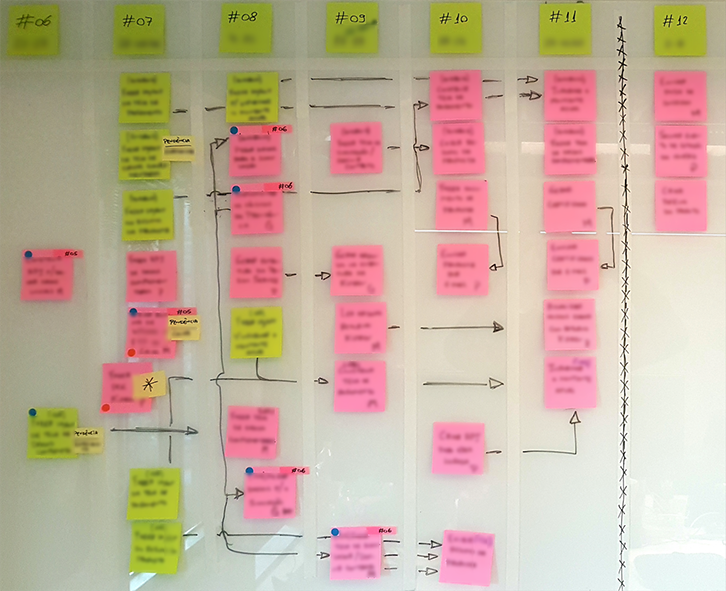
The subtitles are missing, so I’ll explain the details below. By the way, I drew that subtitle next to the tool so that all people could understand each part of the Reality Check. The details are:
- On the top, we have each week before the deadline (painted tape between weeks 11 and 12). We started after week number four because the development of this project started that week, but the picture only shows week six ahead;
- Below the post-its from each week, we have the demands (in this example, user stories). One-color shows the orders from UX/UI (green), another color shows the technical user stories (back-end, for example);
- Each user story was placed in the week in which the team believes (hypothesis) that it will be finished. It’s crucial because we don’t duplicate for each week, so we put the post-its only in the last week;
- If the team believes that the demand starts and finishes in the same week, no problem. But if the team believes that the demand starts in week X and ends in week Y, we put a tag showing the symbol of the week that item started to be developed (such as the first user story from the image of week six, for example, that started in week five). The same rules apply when we have a demand that the team believes will be finished in the future, but started developing in the present (such as the last user story of week nine from the real photo);
- The lines with arrows show dependencies among demands (when existing);
- Yellow post-its (the small ones) show there is a pending issue for those user stories. For example: when the team has conditions to develop the user story, but there isn’t an environment to deploy them;
- Finally, in that example, we have two types of round stickers: a blue one to show demands with work in progress, and a red one to identify the blocked items (when existing).
The logic is simple: which demands we believe we will be able to finish in the first week? And in the second week? And in the third and so on. The main idea is to fill that timeline and check if it’s possible to meet all demands before the deadline. It would be a hypothesis (save this word!), not a schedule or an estimate.
But how can we build the Reality Check Tool? Keep reading.
What and for what?
The Reality Check is an agile tool designed to check how much a delivery remains feasible given the project context. The central idea of this tool is to maintain alignment, giving visibility to the progress of the project and some predictability as to the date of delivery.
In my opinion, most often it’s more relevant for the project to keep the delivery date expectations well-aligned than to accomplish a deadline initially forced for project delivery.
Anyway, if you can work without deadlines, and I hope you do, maybe you’ll have a friendly environment and a great scenario to work on many product solutions. But, if you can’t escape from one deadline, perhaps this tool will be helpful for you, your team, and your stakeholders.
I presented two talks in 2018 about the Reality Check Tool in São Paulo, Brazil, to show the local agile community my experiences using it. I wrote another blog post about the Reality Check Tool in 2017 but in Portuguese.
Building the board
Firstly, you’ll need to map the scope of the next delivery at some details level. Common examples:
- User stories from User Story Mapping;
- A group of system functional requirements;
- Work packages from a WBS (Work Breakdown Structure).
Next, write all the items in post-its. If possible, these items need to be prioritized at some level too (ask your Product Manager to do this). Finally, find a location to maintain the board (your wall, for example). You can keep it virtually also.
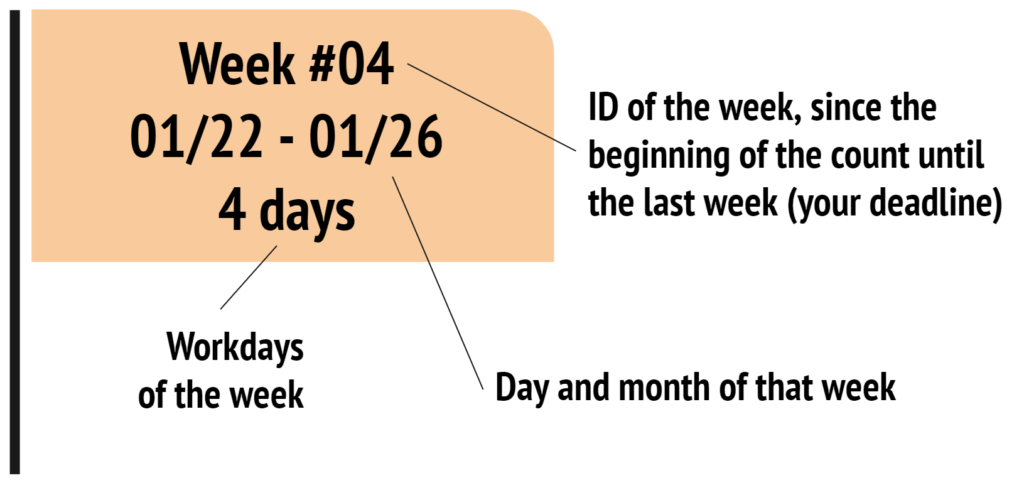
Now, write each week before the deadline from the next delivery in post-its too. A typical question is: how long do I need to map? The answer can change because of the context, but it’s a great space between 3 to 12 weeks (one quarter) — less than three is too much, and more than twelve can be a big mistake.
You can put more essential pieces of information in post-its too. Example:
The next step is to organize your Reality Check tool. Put all demands on the left side, and each week on top distributed horizontally. You can separate each post-it with the weeks using scotch tape (like in the real photo). You’ll have a board like this:
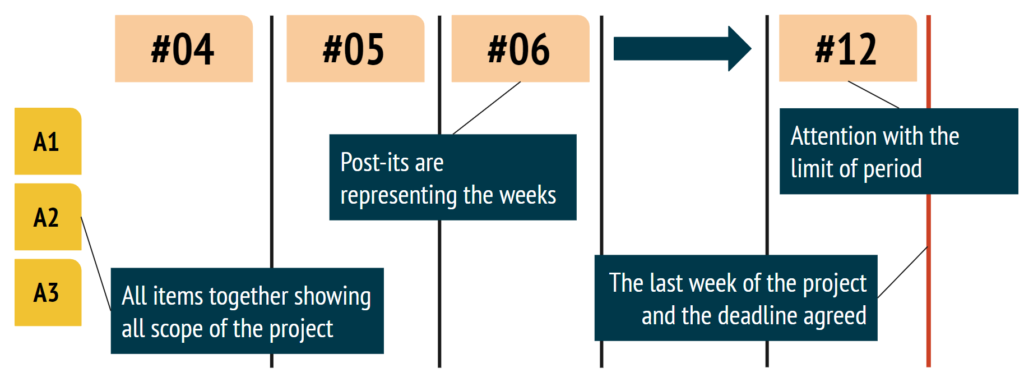
It’s important to emphasize the word project. Maybe it can be your whole project, or only one piece (a big delivery or a subproject, for example). Anyway, it’s an effort limited by time.
The scope of your project can be categorized. For example, you can divide by front-end, back-end, and UX/UI, or user stories from different systems, or in some way that makes sense for your team. You can do this by using different colors of post-its.
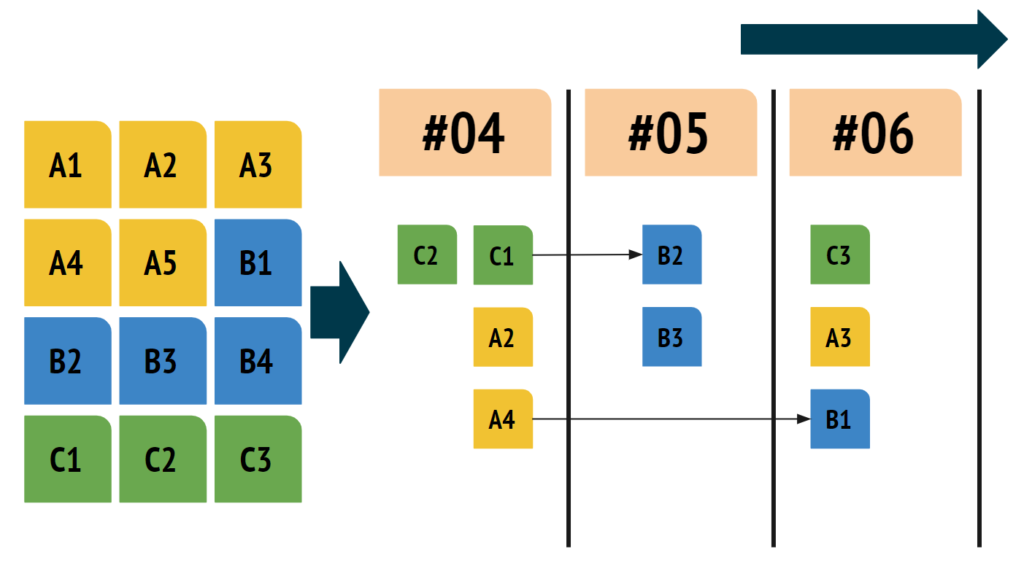
Now it’s the most crucial moment. It’s time to distribute demands in the timeline for the first time. For this, we have one golden rule: the idea isn’t to have precision in item distribution on the board, but to identify if it’s possible to achieve the goal if reality were to happen that way.
Each technical member from the team (developers, designers, quality analysts, etc.) can talk to create the hypothesis. It’s common to be hard to do this in the beginning, but after the first demands, the team gains the ability to distribute all items in the timeline. Don’t worry. There will be doubts, questions, and speculations about many things, such as time, team composition, technical uncertainties, etc. They all are very important, but at this moment we need to create a hypothesis (it’s not a compromise). Assume the necessary premises, respect the restrictions, and distribute the items on the board.
If the setting happens in the first week of the project, the distribution of the first demands can be individual (each person chooses one user story, for example, and put it somewhere on the board assuming that the demand will be finalized in that week). If it’s an ongoing project, the team can start with demands related to development. Remember: the demands are placed only on the week they would end.
Some tips:
- The team will need to have autonomy;
- Everyone will need to be present (in person or remotely);
- If it’s possible, see the throughput of the team. It’s interesting because if the team put more demands in each week, the facilitator can question why they believe it will happen.
By the way, Scrum Masters, Product Owners, Project/Product Managers, Agile Coaches, General Managers, etc. don’t help distribute the items. The Reality Check is an agile tool from and for the technical team, but it’s an excellent idea to have a facilitator.
During or after items distribution, all of the team will begin to notice if it’s possible to finish the scope before the deadline. So, perhaps it’s an opportune moment to negotiate the deadline or the scope. In one of the times when I used the Reality Check Tool, the customer asked us an enormous scope and showed the team their expectations regarding the delivery date. When the team built the Reality Check, we discovered that the period was enough to deliver 20-25% of the scope. It’s excellent information for your customer when seen early in the project.
Your result will be similar to this:
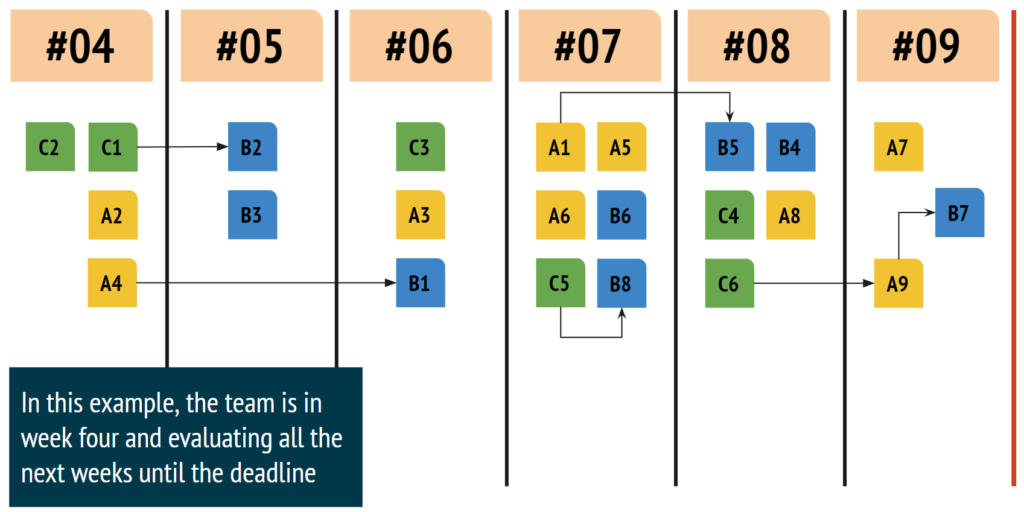
This project has nine weeks, and the team started to build the Reality Check Tool in week four. Now we have the board ready.
Maintaining the board
If you arrived here, you know how to do a Reality Check in ceremony format. You can do it once and start again from the week you are if you want to repeat it.
But you can keep the board and transform it into a tool. For this, the first step is to choose which features the team needs to give visibility and to provide helpful information to make correct decisions.
I like to use features to show which items are a work in progress (WIP), blocked, week of the start of development, and are pending from third parties. For example:
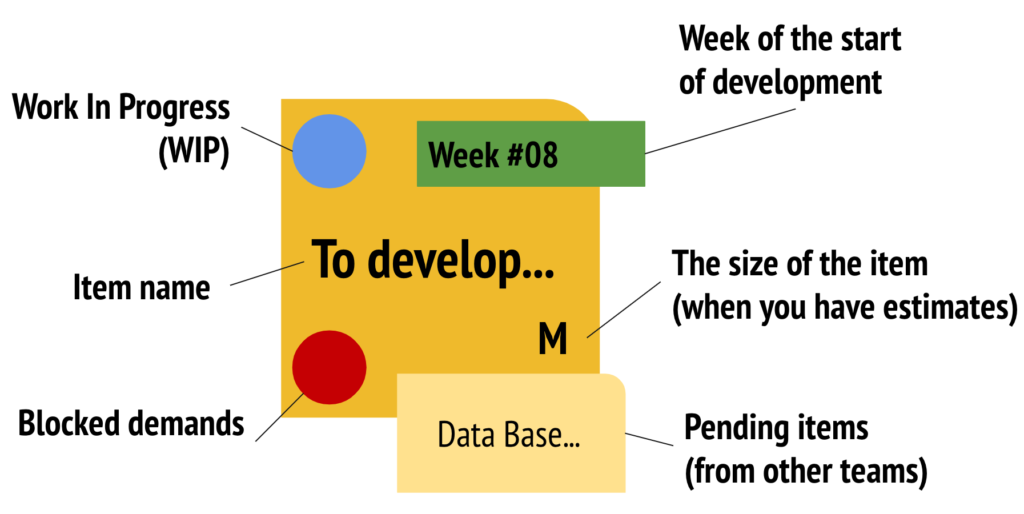
After putting the features in post-its, the team can go to the next step: calculate the perception rate. That technique helps the team to evaluate the level of comfort to delivery scope until the deadline. It’s an answer to the question: numerically, how much are we confident that it’s possible to deliver this scope before the deadline?
Each member of the team gets one post-it and, anonymously, write their number from 1 to 4, where 1 means “I’m not very confident” to deliver that scope before the deadline, and 4 to “I’m very confident” with that hypothesis. After this, the facilitator gets all post-its and calculates the average. Finally, he shows the result to the team.
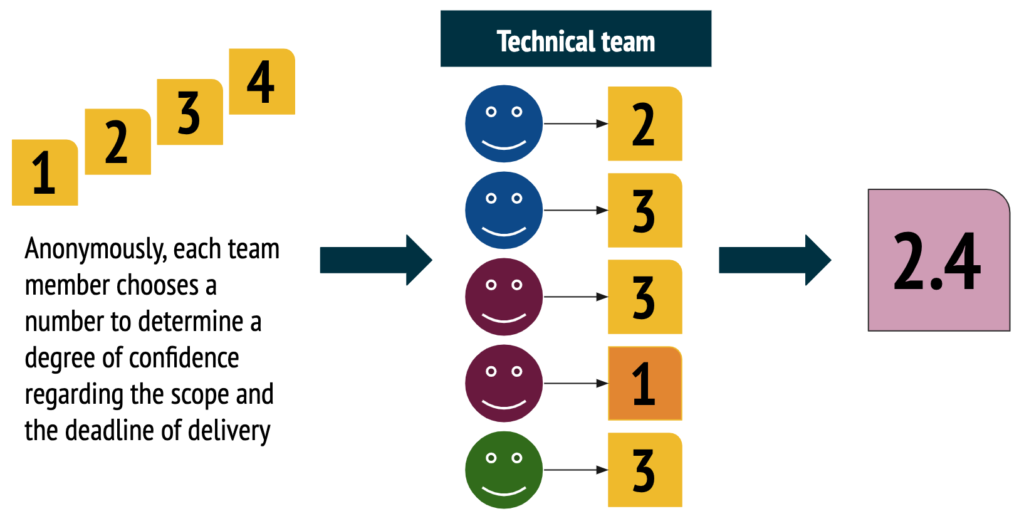
An essential tip: it’s an opportune moment to discuss if each member of the team has many divergences between the degree of confidence. For example, why did a team member put 1, and others chose 4? Maybe they have different perceptions of the actual situation. If necessary, the facilitator can ask for each member to vote anonymously again.
The final number must be on top of each week of the Reality Check Tool. The objective is to observe that perception in the delivery timeline.
It’s time to show how to maintain the Reality Check Tool using the same example. The team distributed all items on the board, placed the features, and calculated the confidence perception rate. Now we have this scenario:
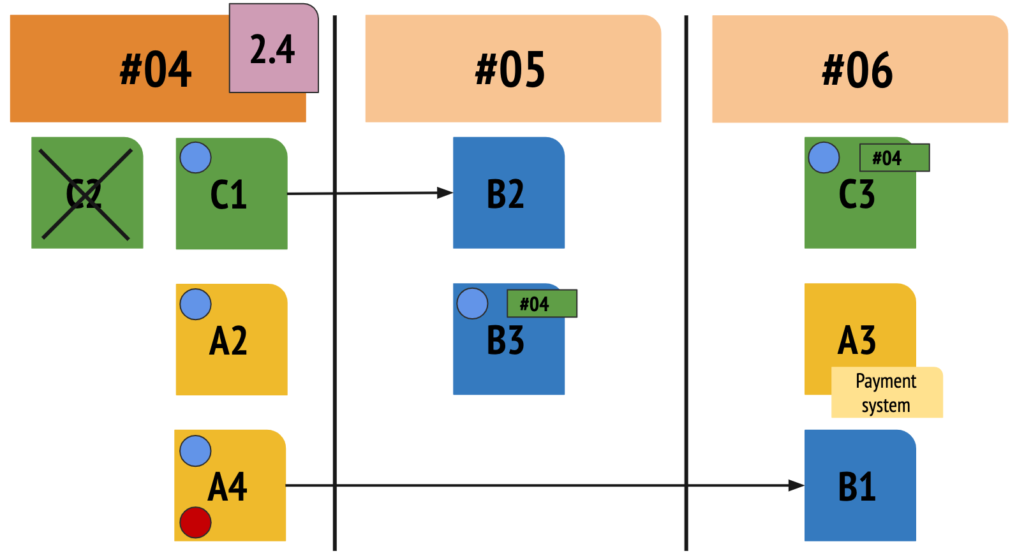
The demand C2 is complete. The demands C1, A2, A4, B3, and C3 are in development (one is blocked). The team knows one pending issue from A3. The team puts tags in demands B3 and C3 because both started in week four. B1 and B2 depend on A4 and C1.
We have five work items in progress. The team believes they will finalize four demands in week four (the demand C2 is complete). B3 started in week four, but the team believes they will complete it in the fifth week. C3 only in the sixth week. This scenario is the original hypothesis.
The team works during this week, and in the next Monday of week five, they need to update the Reality Check Tool. Using the same techniques previously used, now we have this reality:
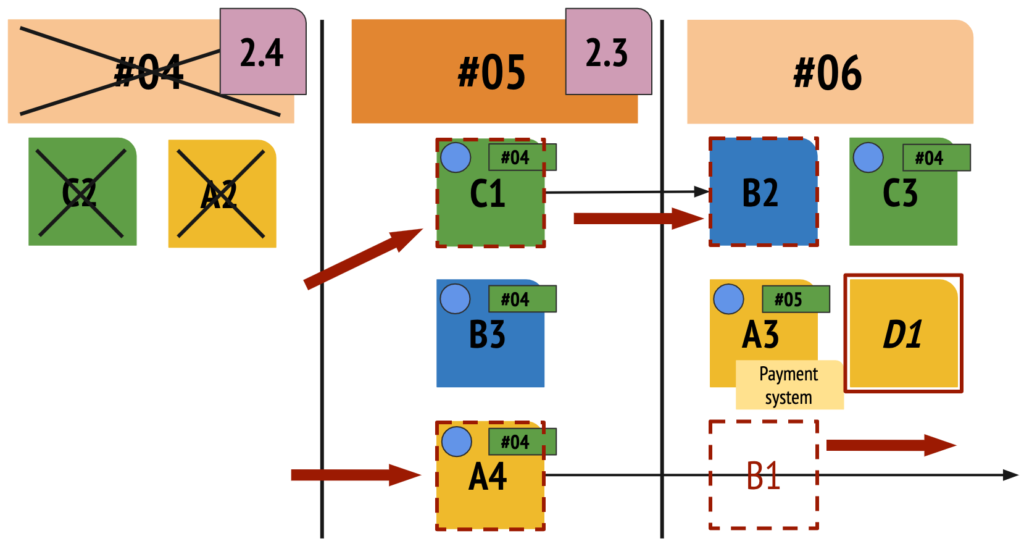
Only the demands C2 and A2 are finished if we compare them with the hypothesis of week four. C1 and A4 moved to week five. Now, the demand B2 is in week six, and we have five works in progress again. Besides that, the team transferred B1 to another week. We have a new demand too: D1.
Adding or removing demands are common, and the team needs to update the board in both cases when it happens. Finally, the team got another perception rate for this week, 0.1 less than last week.
It’s an expected result of Reality Check Tool: every week we create a new hypothesis of delivery based on the reality of the team and of the project! But the team doesn’t need to update the board only once a week. The facilitator can observe all days of the week and keep the Reality Check Tool updated. In the first workday of the week, the facilitator should gather the team to update the board and to find a new hypothesis.
Now it’s the time for week six:
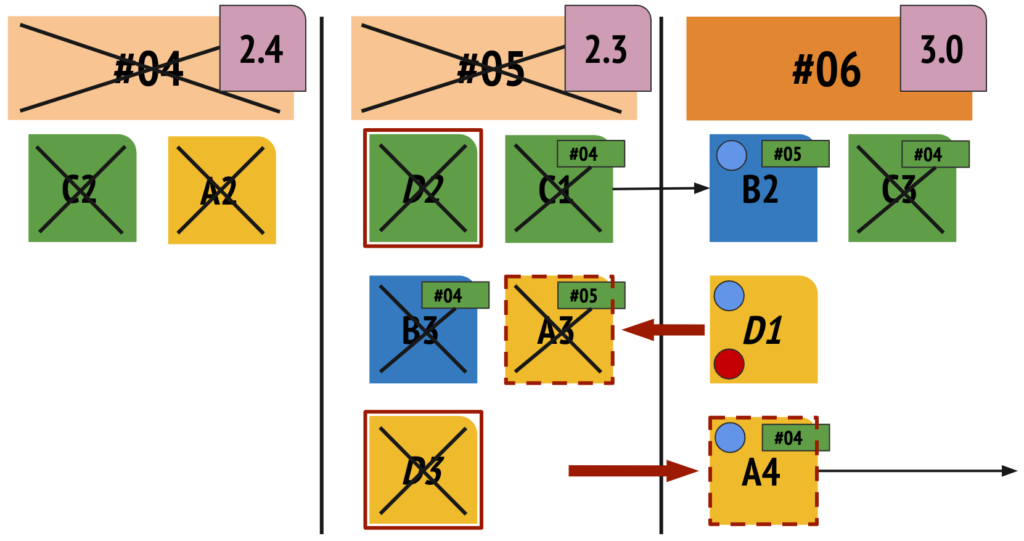
There are many differences between weeks five and six. The team delivered five demands, but without the demand A4 (it started in week four, was developed in the fifth week too, and transferred to week six). One of them is new: D3 (finished last week). In the moment of board update, the team had already delivered the demand C3. D1 is blocked. Finally, another perception rate: 0.7 bigger than last week.
At this moment, I believe you understood how we could maintain the Reality Check Tool, right? So, every week, the team updates the board and creates a new hypothesis to deliver the scope before the deadline.
But there isn’t a unique way to sustain the Reality Check Tool. When the team perceives that it’s not possible to deliver the scope until the date agreed originally, we have some other options. For example:
- Negotiate a new deadline for the delivery;
- Simplify the scope of the delivery to anticipate the original deadline;
- Reduce the scope of the delivery removing some demands;
- Increase the team (more developers, for example).
Imagine the same team keeping the Reality Check Tool. Now we have this scenario:
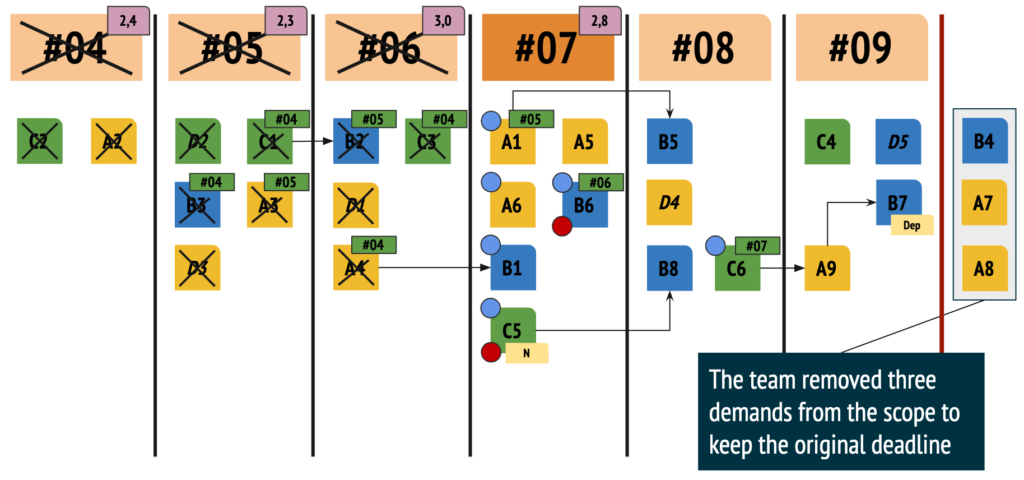
If you sustain the Reality Check like a tool, you can show the reality about what is happening in the project, giving visibility for the deadline to your stakeholders. Therefore, you’ll always give a potential delivery date, and maybe the team can create a connection with your customer. Finally, the team can feel empowered to make decisions.
Summing up
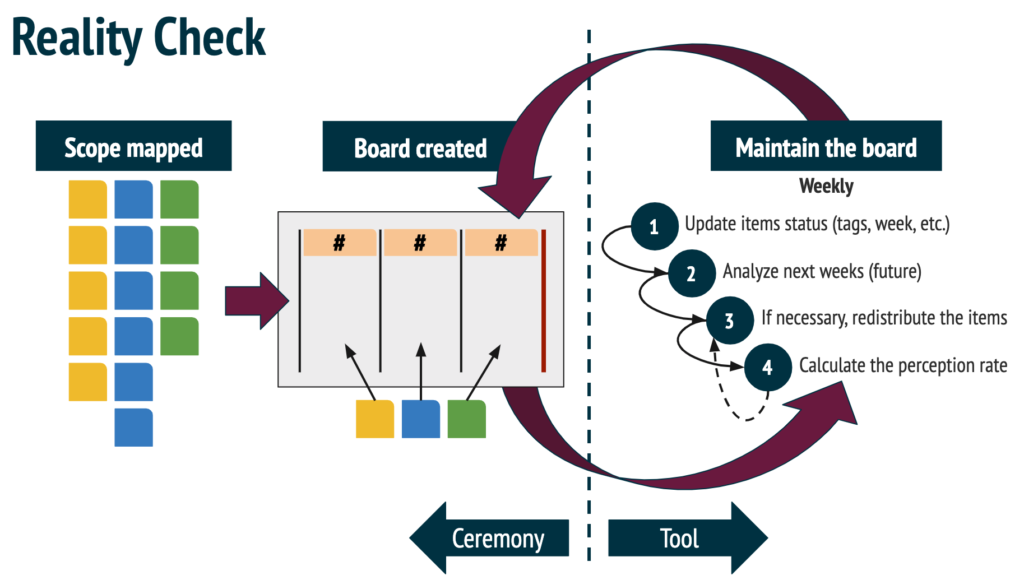
When the team has a deadline, I prefer to use Reality Check like a tool because it can give visibility to my customer. But, if the team doesn’t have a date to deliver the scope or if the deadline isn’t critical, the ceremony may be better to align expectations.
Other real examples
I have two more examples from different projects to show you, both from 2018. Firstly, a Reality Check used in ceremony form:
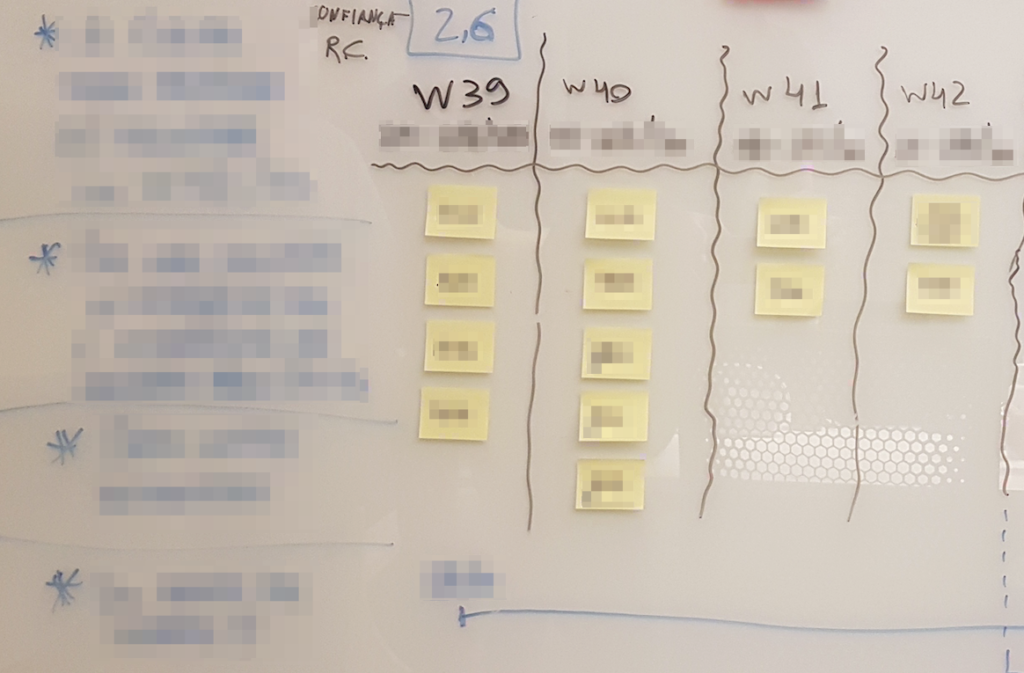
Now, two photos showing the first and the last week of the first delivery from another project (made virtually).
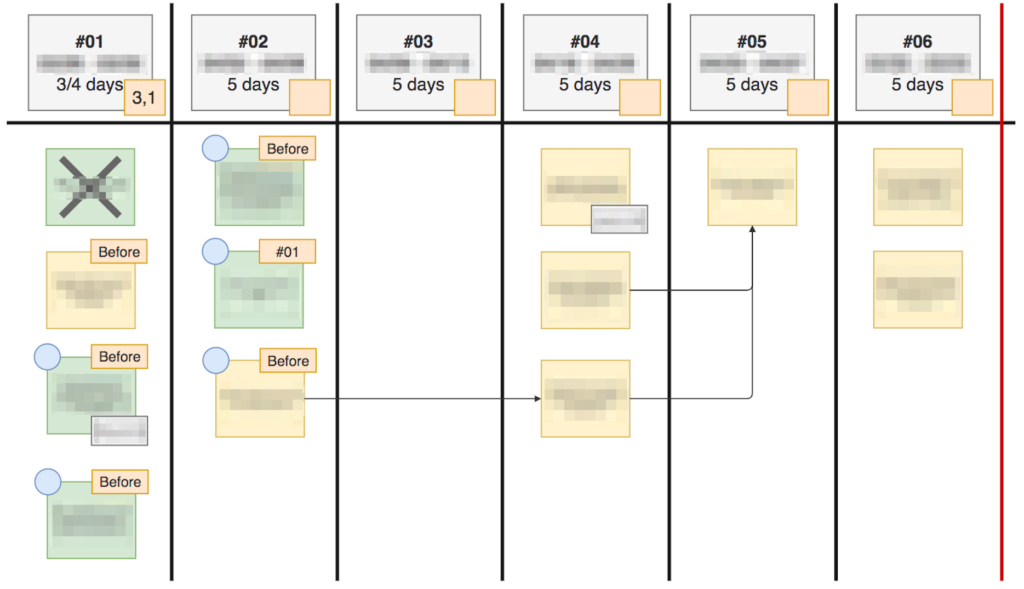
First week:
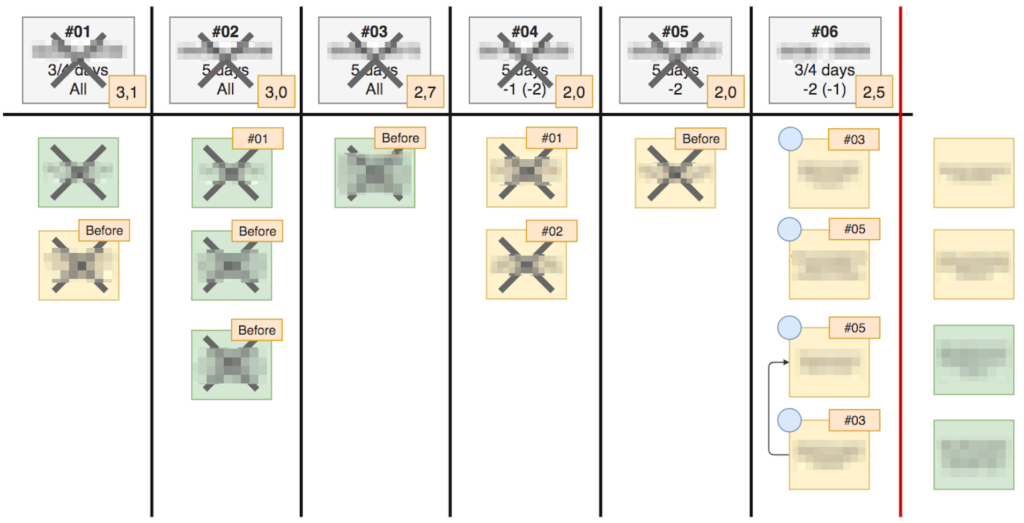
Last week:
Notes: some demands have a tag with the word “before.” These user stories are demands initiated before the construction of the Reality Check Tool. And below the days in post-its with the weeks, we have the word “all” and other nomenclatures, such as “-1 (-2)”, “-2”, etc. This detail is to show when one or more people from the team are out in that week because of a specific reason (examples: vacation, sick leave, etc.).
Additional comments
Perhaps you think the Reality Check Tool is an agile schedule, or a Gantt Chart 2.0, or even an estimate. This tool has some similarities with these practices/techniques, I agree, but it’s different! Let’s understand:
- Why isn’t it an agile schedule? You don’t need to map general or admin tasks (such as meetings, reports, travels, etc.), allocate human resources, define milestones, estimate effort for the activities, and others;
- Why isn’t it a Gantt Chart 2.0? You don’t need to allocate resources in tasks to see them in the project timeline, define dependencies to many activities, review costs, analyze expected versus done, etc. Generally, we use both to have a commitment to the project, but the Reality Check Tool is a hypothesis renewable;
- And why isn’t it an estimate? You don’t need to find a number to quantify something, including, for example, to transform the result in a price or total hours of the project.
Finally, I think it’s essential to comment about my experience using the Reality Check Tool. I used it in software development projects, generally in teams with squad format. In all situations, the teams used other agile practices too, such as framework Scrum, Kanban method, and flow metrics. In general, the teams were formed by 8 to 12 members (including all roles).
Advanced tips
I have helpful tips to share if you decide to use the Reality Check Tool. Maybe one or more tips can help you and your team. Let’s go!
- It’s a good practice to maintain a facilitator to keep the board updated. Daily the facilitator updates the features (finished items, blocked demands, etc.), and once a week (preferably on the first business day) the team updates all things and creates a new hypothesis to deliver the scope before the deadline. If necessary, it’s a great moment to negotiate a new date to deliver, simplify the scope, etc.;
- The facilitator can help the team in delicate moments, such as when the customer pressures the team to comply with the first deadline. Be careful with extra hours, questions about the commitment of the team, and other situations;
- Don’t identify a person for each demand. The Reality Check is a tool for all the team, including decisions and responsibility;
- You don’t need to use the Reality Check Tool in all project deliveries. Use it when the team has a real and vital deadline;
- When the team is building the tool, the facilitator can use other things to help analyze the hypothesis. Lead time and throughput are two good examples. A possible good question is: why will these three demands be finished in ten days (two weeks) if our lead time average is 17 days? Or why do we believe our team can do the scope until the date if the Burnup projection shows other dates? Here I share another real example from a project:
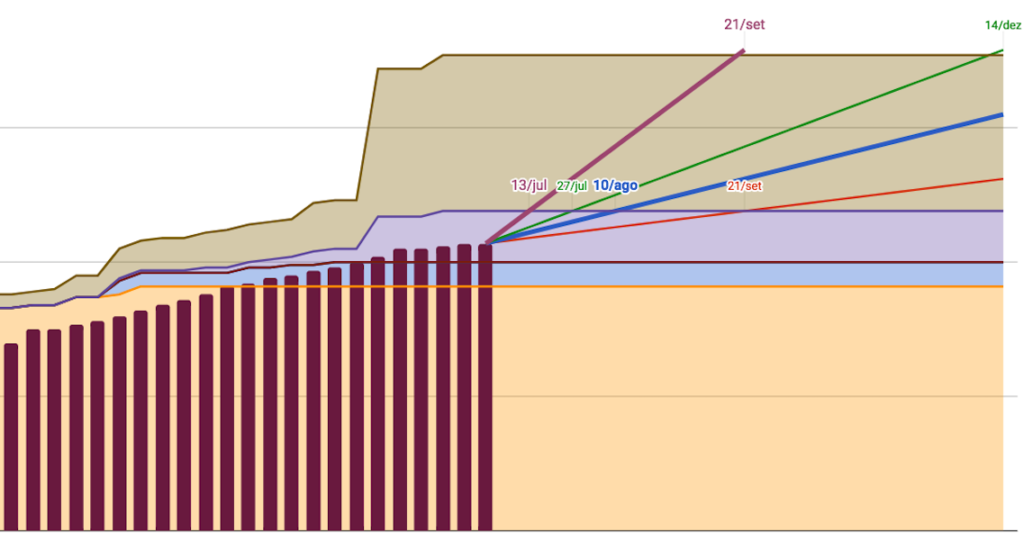
In this Burnup example, the forecast for the next delivery is August 10 (most likely), September 21 (pessimist), or July 27 (optimist), all based on historical throughput data, but the Reality Check Tool from the team indicates July 13. In this case, somebody can ask about it and understand the opinion of the team in contrast to predictions from Burnup.
If you don’t know about Burnup and throughput, I recommend you to read the blog post Why we love metrics? Throughput and Burnup charts, written by my friend Raphael Albino.
- Only technical teams can choose the position of each demand. Product Owners or Product Managers can prioritize the user stories, for example, but never determine when and who will do them;
- You can use other tools and practices with the Reality Check Tool. The idea isn’t to substitute other tools. So, the objective is to aggregate. Even when I used the Reality Check Tool the team had a kanban board, as well as daily meetings, retrospectives, flow metrics, etc.;
- When you have many demands, the team can use lanes to organize the board (by demand-type, for example);
- Don’t put business demands in the Reality Check, such as meetings, travels, etc. The focus needs to be only on technical demands.
I hope you have liked the Reality Check Tool. I’d appreciate receiving suggestions, more explanations, and I’d also like to exchange experiences. Leave your comments below.
Thanks for reading!