
When you are learning about Kanban, one of the first things you hear is “always limit WIP, you should”, or a less Yoda-ish version of it. But when you decide that you will indeed use WIP limits and google “WIP Limits for dummies”, you won’t discover any walkthroughs or easy-to-implement equations to discover what limit to apply to each column of your kanban board.
In this post, we’ll talk about how was our experience introducing WIP limits on the Elixir Radar project, explaining how we used to handle the project flow before the implementation, what was the a-ha moment that made us apply the limits, how we implemented them, the benefits of doing so and some discussion on the technique.
We hope that, after reading this, you will understand why it is impossible to have a silver-bullet step-by-step walkthrough on how to implement it and hopefully will gather the necessary knowledge and courage to start limiting the WIP in your project.
Before WIP Limits
Initially, we were handling the process flow by looking daily at the kanban board and defining if a person should get more work, help out with other cards that were blocking someone or just wait until the system’s saturation was diminished. We were especially worried about two specific columns: “UX” and “Dev”; that from day one were clearly the bottlenecks of the process. Therefore, we just managed how full those columns and their queues were and then took actions.
The a-ha moment
At a specific moment in the Elixir Radar project, we decided to schedule a refining ceremony due to the lack of stories on the refining column. However, at our daily meeting we saw that we had sufficient buffer for both Dev and UX columns.

Besides that, we observed our lead time breakdown chart (for more information on lead time breakdown charts, check our blog post: Why we love metrics? Cumulative flow diagrams ) and saw that the tasks were staying too much time on queues.
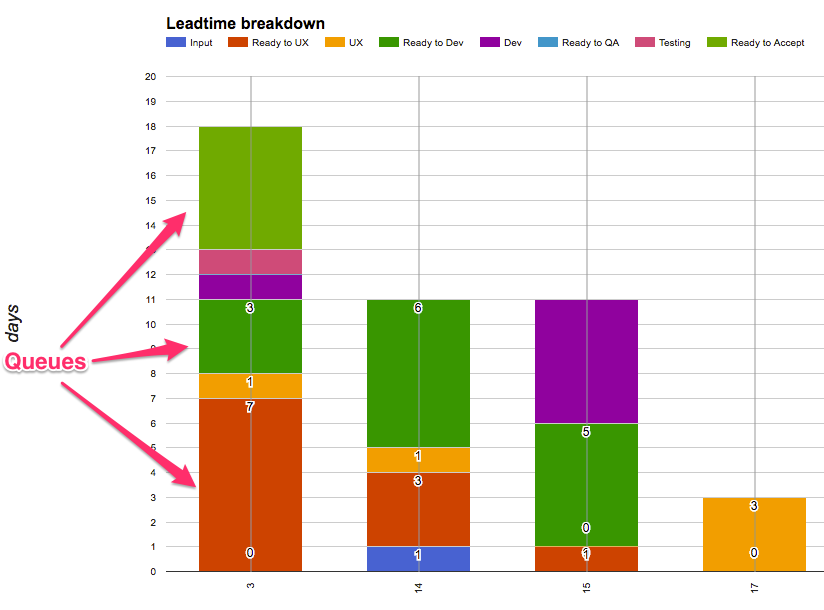
Based on those facts, we decided to abort the mission and not have the meeting. To tell you the truth, it was so unnecessary that we only held it one week later. Then, we decided to apply the WIP limit so we could have a faster feedback on the process saturation without the need to keep looking at the board and making mind simulations of the process flow.
How we implemented it
In order to start using WIP limits, we did what everyone does: googled how to do it. However, there were not many explanations on how to calculate and apply the limits. But we did find one post that shed some light on how to start it. Pawel Brodzinsky’s blog post “The Kanban Story: Kanban Board” and a comment on a forum on how to specify wip limits in Kanban gave us some insights and presented two strategies to start WIP limiting:
- Use a floor approach, in which you would use limit values that are obviously small but, when you felt the pain of it being small, you could raise its value.
- Use a ceiling approach, in which you choose a limit value that is greater than what you need and you will slowly decrease its value until you feel the pain of it being too small.
So yes, there is no silver-bullet-function that would give you the best number. Or is there? Well, we always knew that something like Little’s Law may be able to give us the right number from the beginning, but we didn’t feel we had enough data to calculate the average throughput for each column to use it. Maybe that will be a future blog post :).
Therefore, we used what we had in hands: we chose to follow the first strategy from the two mentioned above. We decided that as we believed it would give us a faster feedback cycle, and we would reach the right limit faster.
To start, we limited only two process bottlenecks, the columns UX and Developing. We applied a limit of 1 to each of them, since we only had one UX specialist and one developer.

Some days passed and we saw that we could actually also limit the queues preceding each bottleneck, in order to clearly block the UX when the “Ready to Dev” column got full. We decided to limit both of them in two stories. As the cards were moving to the right of the board, we decided to also limit the other columns (Ready to QA, QA and Ready to Accept).

However, something unexpected happened on the second week. The “Ready to UX” column had space for one more story, which would be the trigger to have a Replenishing (ceremony to choose the next stories that will go to the “input” column, already prioritized) and Refining ceremony. Nonetheless, we saw that “Developing” was now the bottleneck of the system, and “UX” was already blocked due to “Ready to Dev” having reached its limit. We then saw that the limit for “Ready to UX” was too high, which was not expected since we followed the floor approach.

With that in mind, we reduced the limit to one.

Another thing that we changed in our process was the “Refining” column. We saw that we moved a card from “Input” to “Refining” and then to “Ready to UX” too fast, what made the existence of the “Refining” column questionable. Therefore, we decided to remove it, and define that a card would only be moved from “Input” to “Ready to UX” after the refining ceremony.

Later, in order to have better control over ceremony scheduling, we decided to also limit the “Input” column in two stories. That means that we would hold both replenishing and refining ceremonies with only two stories to work on, what would make us more agile in case of changes.

Benefits
After some weeks running with WIP limits, we can already see some benefits in our system. The first one is eliminating unnecessary meetings. This was the trigger for limit implementation and it actually worked: the refining ceremony is only held when necessary and now the process itself gives us the hint to when to have it (when the input column is empty). Besides that, we also only refine two stories at a time, which drastically reduces the time of the meeting.
With the “Input” column limit, we can now predict when the next replenishing ceremony will happen. If we divide the “Input” column limit by the average throughput of the system, we have the number of weeks that the system will likely run with no extra stories. Since our team has the availability to have weekly ceremonies, we define the limit as equal to our system throughput (two stories a week).
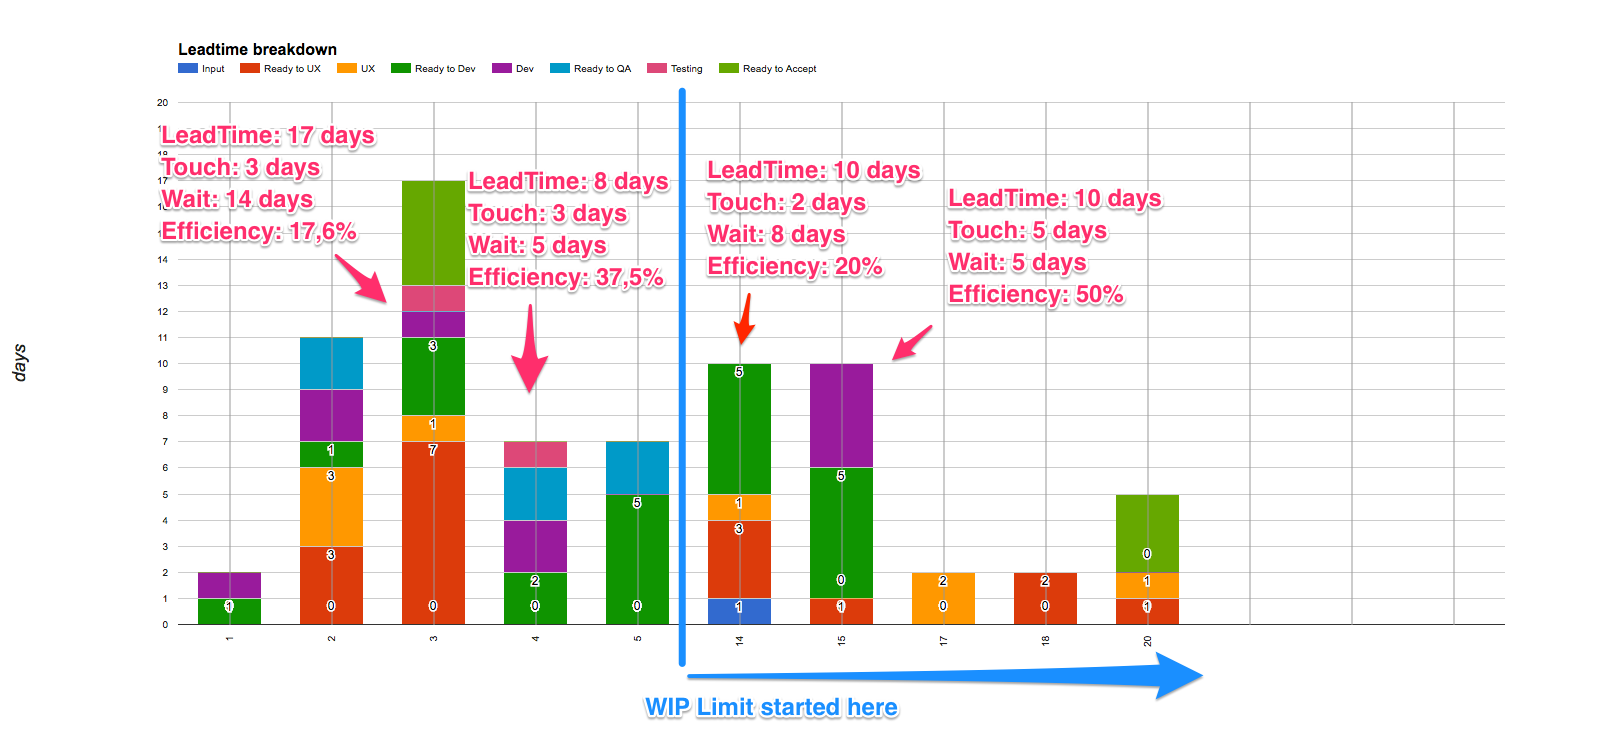
A major benefit that happened was the reduction of the stories’ waiting time. As we can see on the chart below, it is clear that the time spent on the “Ready to UX” column reduced since we applied the limits. Moreover, when we compared similar stories, we can see that the average flow efficiency actually improved in 6% (flow efficiency is defined as the touch time divided by the lead time). We know that we don’t have enough evidence to statistically prove this improvement, however we can feel it on a day-to-day basis.
A last benefit that we observed is specific to the Elixir Radar project, but someone may encounter the same situation in their projects. Our UX specialist has more than one project running at a time, which means that she gets different tasks from different projects at the same time. That makes it difficult to prioritize which task to do first. But now, since she is not the bottleneck of the project, when the limit of the columns in which she works is reached, she can work on other projects without feeling guilty.
Further discussion
After that experiment, Plataformatec’s team got together to discuss the technique and get further insights on WIP limits. And we want to share with you some points:
- The limit of a column WIP is not directly related to the number of people that work on that column.
- If we have two developers, for example, we could still have a WIP limit of one in case they use pair programming.
- It is possible to limit the WIP for the whole system instead of column-wise.
- We would have less fine tuning on the system, but it could be easier to start with.
- A hybrid solution of the two last points would be to limit some process domains.
- An example would be to limit both “Ready to UX” and “UX” columns with one number.
- WIP limit helps on the communication of blocks to stakeholders.
- How we could sell to stakeholders, directors and C-levels that idle people on the system, due to blockage, are not a bad thing:
- Demystify the sense that “Slack is bad”. The person that is currently blocked could be using that time to improve its technical skills or helping other people to deliver their stories faster.
- We could show a more process-driven explanation: If person A has a throughput of 5 stories and person B has a throughput of 1 story, the whole process has a throughput of 1 no matter what person A does. Therefore, it is useless for he/she to work more than what is needed to deliver a throughput of 1 story.
- Another way is to show metrics of the process, like CFD and Lead Time, before-and-after, in order to expose the benefits. (For more information on CFD and Lead Time, check our blog posts: Why we love metrics? Cumulative flow diagrams and Why we love metrics? Learning with Lead time)
- Scrum limits WIP as well.
- We discussed that Scrum limits WIP when it uses the time-box approach. You only put in the system what will be consumed in your sprint. The difference is that in Kanban we can choose the number of items in the “Input” column according to the necessity of the team at that moment.
- Starting a project without the WIP limit may cause its later adoption more difficult: If you run the process for a month without the limit, for example, the improvement in the process may take a while to be noticed, following a J-curve effect (Michael Papanek’s blog post: Four Strategies for Navigating the J Curve of Change).
- We don’t know how deep will be the J-Curve’s “Valley of Death”, in other words, we don’t know how long it will take for our improvement to be noticed. It could be null, in the sense that the project would start improving right away or it could take months. In the last case, if you have a tight deadline it may be difficult to implement it.
- WIP limit is more related to controlling the process flow than visualizing problems.
-
WIP limit is a step towards collaboration promotion, because if people don’t help each other the system can get deadlocked.
What about you? What do you think about WIP limits and its benefits? Did you like our approach? Share your thoughts with us in the comments below!
